Lightaholic's Page
Solid State Relays

Home

Solid State Relays | Christmas Lights | Garden lights | Dj light Gallery | X10

11373.gif

12532.jpg

If you wish to purchase some solid state relays click here!

To learn more about solid state relays, (ssr) and other electronic projects, please go to Drew Hickman's relay page. Don't forget to stop by the ChristmasCave!

How to make your own solid state relay.
 
 
Supplies needed for each relay:
 
1 100 ohm resistor
1 470 ohm resistor
1 optoisolator (MOC03242 will work well Jameco #113961)
1 triac(SC146B will work well Jameco #31819)
1 piece of prototype circuit board (MPJA #14254)
 
Links for electronic parts: Jameco, MPJA, Digikey
 
You will also need some small guage wire and electronic solder.
 
Tools needed:
 
Soldering iron
Needlenose pliers

Here is a schematic of what you are about to make.

solid_state_switch1.gif

Steps


1. Bend off pins 3 & 5 on the opto. As you can see in the schematic they won't be needed.

2. Insert the opto into the board.

3. The triac (notice that the triac is UPSIDE DOWN and how I've bent the pins on it)

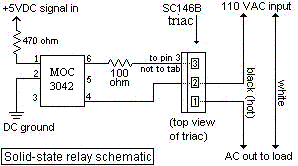
4. Next solder the 100 ohm resistor as shown in the schematic. It goes from pin 6 on the opto to the top pin (pin 3) on the triac.

5. Solder the black side of your AC input to the board where the schematic shows. Remember that this shouldn't touch the triac or anything else.

6. The output wire goes to the black (hot) side of an outlet.

7. The next step is to connect your DC ground from your control source to the optos' pin 2.

8. The final step is to connect your TTL logic signal (+5VDC) to pin 1 of the opto. Don't forget to add the 470ohm resistor in series with this connection.  This resistor keeps the the LED in the opto from being blown with too much current.

Instructions courtesy of Drew Hickman.